Understanding how to fit a bike helmet for a child is not negotiable in terms of your kid’s safety to obtain a good fit. Kids’ bike helmet won’t live up to its objective if it isn’t properly fitted! Kids’ helmets mustn’t flop about on a kid’s head; but should rather remain securely in place, even while the youngster is moving! While riding a bike, skateboard, or scooter, a kid should always wear a properly fitting helmet. A helmet that isn’t the correct size won’t remain in position and won’t save your kid’s head adequately if they crash! The various sizes of children’s helmets have a variety of names. Toddler, child, adolescent, XS, S, M… The sizes of helmets may be referred to in a variety of ways, depending on the manufacturer! There’s just one factor you ought to pay attention to your kid’s head circumference! Every helmet will have a head circumference range, regardless of size. The helmet should fit your child’s head if it falls within that range! So, to know more about the way for proper bike helmet fitting go through this article.
Guidelines for Buying Kids Bike Helmet
To get a proper fit, knowing how should a bike helmet fit a child is not debatable in terms of your kid’s safety. Along with knowing bike helmet sizes by age, it’s also important for you to consider that a helmet has a lot of other characteristics that can influence how comfortable it is to wear and how easy or difficult it is to modify. What else should you consider, then, when you choose best toddler bike helmet for good bike helmet fitting?
- Adjustability
Any helmet worth purchasing should have a method for interior adjustability to ensure a proper fit. Internal adjust mechanisms enable the helmet to adapt to skulls of many sizes, helping the helmet remain in position and improving the child’s protection because children’s heads come in a wide variety of forms and sizes. The strap sliders and a helmet’s interior adjustment mechanism both work together to keep a helmet firmly on a child’s head. The cheek bands on a helmet should come to a “V” just below the child’s ear to prevent the helmet from tipping forward or back. The straps are kept together by plastic sliders so they can proceed to the clasp together. The helmet is much more likely to fall forward or backward on a child’s skull if it is not correctly positioned below the ear.
- Flat Back for Infant Cycle Racks and Trailers
A helmet with a flat, smooth rear will aid in preventing it from rolling forward during a journey if you intend to transport your children in a trailer or bike seat.
- Normal Bike Helmets Versus Skater-Style Multi-Sport Helmets
Skater-style and standard cycling helmets each have their benefits and drawbacks. Traditional cycling helmets can be more difficult to put on skulls with unusual shapes even though they are lighter, have more ventilation, and are more adjustable. Skater-style helmets tend to be heavier, lack a visor, have fewer ventilation, and are less likely to have dial-in adjustments, but they also offer more coverage, can be dual-certified, and are usually better at fitting skulls of unusual sizes.
- Normal vs. Adhesive Buckles
Although a buckle may not seem important, children who experience discomfort while attempting to secure a helmet are less likely to wear them, which frequently results in unwarranted conflicts with parents. Many various businesses have created “pinch-free” closures to avoid pinching.
- Hardshell vs. In-mold Building
In-mold and hardshell are the two primary kinds of helmet construction. Both construction styles offer sufficient crash safety, but they differ in terms of design and longevity. The way the exterior plastic protective shell is attached to the foam center of the helmet is the primary distinction between the two kinds.
- Visors – Sun and Facial Protection
A more enjoyable journey will undoubtedly result from shielding children’s eyes from the light. In contrast to skater-style helmets, which typically lack visors, conventional cycle helmets typically have built-in or clip-on visors. As they offer crucial facial protection in the event of a face fall, built-in visors are frequently found on preschool helmets. The majority of juvenile helmets come with snap-on visors that are purely decorative or offer only a little solar protection.
- MIPS, or Multiple Impact Protection System
MIPS is an extra safety element that is available on a number of expensive helmets. No matter which way the collision is coming from, the Multi-directional Impact Protection System, or MIPS, enables the energy from the accident impact to be absorbed by the helmet.
- Safety Approval from CSPC/ASTM
Consumer Product Safety Commission (CPSC) requirements must be fulfilled by all helmets distributed in the US, and they must bear a sticker identifying them as such. Therefore, every bicycle helmet marketed in the US is “safe” in terms of offering protection, but only if it is correctly adjusted and made to a child’s head. We think that higher-end helmets typically provide superior total protection because they typically give a better fit and remain in position more firmly than lower-end helmets.
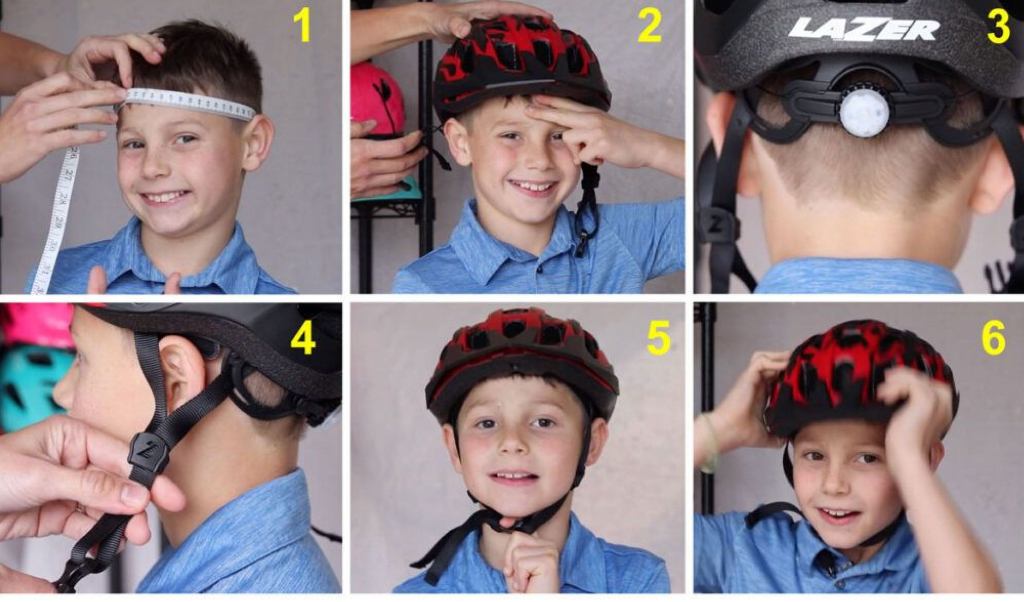
The following six easy steps will show you how should a bike helmet fit a child perfectly so that it remains snugly on your child’s head, and ensure that your child has the protection they need to travel safely.
Step 1: Gauge The Head of Your Child to Find the Perfect Size
Never purchase a helmet without first putting it on. Ascertain that the helmet is secure. So, to find out best toddler bike helmet you need to measure the head of your child. You can Measure the child’s head diameter using a soft tape measure about an inch above their eyebrows, or the largest portion of their head. Make sure the helmet cannot shift side to side while it is flat on top of your skull. A size pad Use the sizing cushions that are included with new helmets for a tighter fit. Should your child’s cranium expand, you can remove the additional cushions. All-Purpose Bracelet If the helmet has a universal fit ring rather than pads, you can change the size of the ring to make it suit securely on your head.
If, for any reason, you are unable to have the child measured in person (for instance, if you are the grandma buying the helmet as a gift), you can use the figure below presented the bike helmet sizes by age.
Age | Circumference of Head (cm) |
12 Months | 46 |
2 Years | 48 |
3-5 Years | 51 |
6-10 Years | 53 |
11+ Years | 56 |
Step 2: Proper Positioning
When a kid is traveling, kids bike helmet that is too low or tilted forward can impede their vision. A child’s face or cranium won’t be adequately protected by a helmet that is too high or turned back. So you need to follow the instructions given below:
- If your kid has a tight ponytail or hair clips, take them out so the helmet can fit snugly on their scalp.
- Place the helmet firmly on top of your child’s cranium.
- Two finger widths or so should separate the headgear from the child’s forehead.
- When observed from the side, the tip of a child’s snout should extend past the back of a correctly positioned helmet. Have your kid hit their headgear against a wall to see if it works.
Step 3: Adjust The Size to Be Tighter
Olympic athlete and instructor Ed Clancy states, “If the helmet leaves a crimson stain, this is the incorrect size helmet for your kid.”
Even though the helmets claim they are the same size, children’s heads come in a variety of shapes where you need to know bike helmet sizes by age as given above. Before fastening the helmet, tighten the dial-adjust handle on the rear of the helmet once it is properly positioned on the wearer’s head. You need to-
- Turn the knob until your child’s cranium is comfortably secure inside the interior enclosure.
- The helmet should have some cushions that come in different thicknesses to expand or loosen the inside of the helmet if it does not have a dial-adjust knob.
- Have your kid shake their cranium back and forth to ensure the helmet is securely fastened (without it buckled). The headgear ought to remain securely in position.
Step 4: With The Side Straps, Form A “V”
To achieve a solid fit, the side strap adjusters must be adjusted, but this is a step that is frequently skipped. If your sidebands are already sewn together, just don’t stress about this process since some later helmets do not have these sliders.
- At the base of the child’s ear, the straps should create a V after being modified with the sliders.
- This keeps the child’s cranium in the middle of the helmet. The helmet may move forward or backward on a child’s head while they are wearing it if the slider is not properly set.
- While some slides secure into position, the majority of them allow for simple up-and-down movement of the side strap. Therefore, it’s crucial to frequently examine the sliders’ positions.
Step 5: The Chin Strap Should Be Lengthened.
The kid should be able to buckle the chin strap, but it should also be snug enough to accommodate just one finger between the jaw and the strap.
Step 6: Examine Frequently
- Every time your kid rides, you should examine the fit of their helmet.
- Just as crucial as making sure your kid is wearing a helmet is a frequent adjustment.
- Helmets can readily and rapidly lose their setting.
Premium Gears for Your Precious Toddlers
What of the everyday cyclists in the neighborhood – do they require knee protection as well? Knee and elbow protectors offer youngsters a feeling of security that enables them to explore and be adventurous beyond their usual tendencies, as we’ve seen over and over again. Likewise, toddlers’ helmets and pads may assist in avoiding even minor injuries!
While the market is saturated with helmets and safety gear for kids, it’s always a pain in the neck to find out the best option for our kids. In such cases, giants like Nutcase and Schwinn are nailing it with their sturdy and solid products. Some of the best Nutcase toddler helmets are:
- Vibe w/MIPS (Little Nutty)
- Wild Child w/MIPS (Little Nutty)
- Ride The Plank w/MIPS (Little Nutty)
- Surfs Up w/MIPS (Little Nutty)
- Candy Coat (Little Nutty)
- Supa Dupa Gloss w/MIPS (Little Nutty)
- Doh Gloss w/MIPS (Little Nutty)
- Robo Boy Gloss w/MIPS (Little Nutty)
- Dig Me Gloss w/MIPS (Little Nutty)
- Stars are Born Gloss w/MIPS (Little Nutty)
- Sup Dog Gloss w/MIPS (Little Nutty)
- Tongues Out Gloss w/MIPS (Little Nutty)
- Vikki King Gloss w/MIPS (Little Nutty)
All of the aforementioned helmets cost somewhere between 50$ to 70$, which is a pretty good deal considering how durable these things are. Schwinn has its offering in this segment with more aggressive price brackets. Some of the best schwinn toddler helmets are as follows:
- Dash Child’s Bicycle Helmet
- Kid’s Dash Bike Helmet
- Flash Youth Helmet
- Kids Insight ERT Helmet
- Yahara Kids ERT Helmet
- Kids Halcyon ERT Helmet
- Kids Bunker ERT Helmet
- Kids Sequel ERT Helmet
Let’s Watch A Video Review!
Conclusion
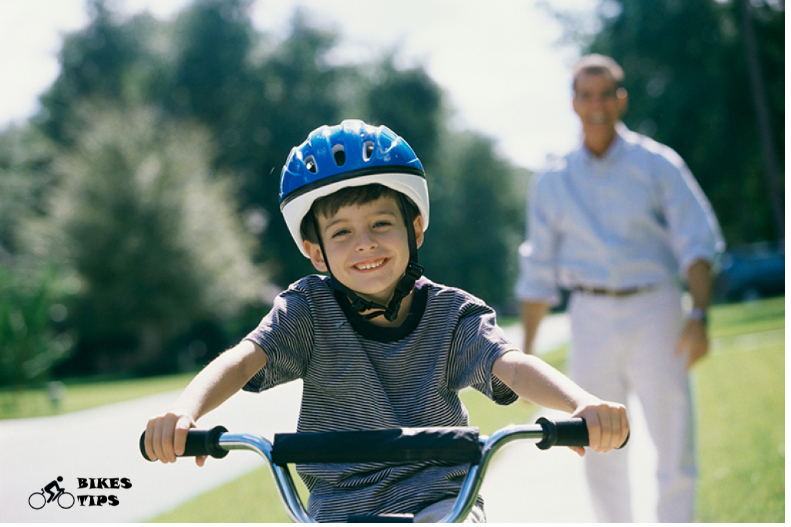
To know how to fit a bike helmet for a child is crucial because a helmet won’t live up to its goal if it isn’t correctly fitted! Helmets for kids mustn’t flop around on a kid’s head; they should rather stay firmly in place, even when the child is moving! While riding a bike, skateboard, or scooter, a child should always wear a properly fitted helmet.
You can share your expectations and preferences with us about bike and bike accessories-related issues. We are promised to answer your queries and to solve your problems. Please let us know your view bikestips.com.